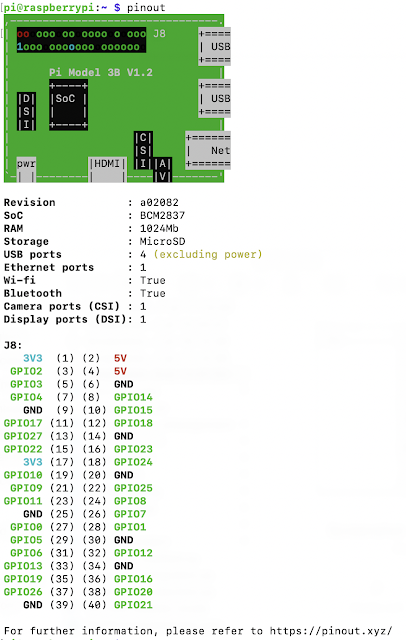
The pinout command gives this summary.
This is what the output looks like. From this you can see that the Raspberry Pi Model is 3B V1.2


import org.junit.jupiter.api.Test;
import org.junit.jupiter.params.ParameterizedTest;
import org.junit.jupiter.params.provider.MethodSource;

import java.util.stream.Stream;

import static org.junit.jupiter.api.Assertions.assertTrue;

public class ParametrizedTest {

    @Test
    @ParameterizedTest
    @MethodSource("stringProvider")
    void test(String string) {
        assertTrue(true);
    }

    public static Stream stringProvider() {
        return Stream.of("", null, "123");
    }
}
import org.junit.jupiter.api.Test;
import org.junit.jupiter.params.ParameterizedTest;
import org.junit.jupiter.params.provider.MethodSource;

import java.util.stream.Stream;

import static org.junit.jupiter.api.Assertions.assertTrue;

public class ParametrizedTest {

    @ParameterizedTest
    @MethodSource("stringProvider")
    void test(String string) {
        assertTrue(true);
    }

    public static Stream stringProvider() {
        return Stream.of("", null, "123");
    }
}
using System.Collections;
using System.Collections.Generic;
using UnityEngine;
public class Reskin : MonoBehaviour {
public string costumeName;
string currentCostume;
void Start () {
currentCostume = costumeName;
ChangeCostume (currentCostume);
}
void Update () {
//only change the costume if the costume has to be changed
if (costumeName != currentCostume) {
ChangeCostume (costumeName);
currentCostume = costumeName;
}
}
public void ChangeCostume(string costumeName) {
Sprite[] facialHairSprites = Resources.LoadAll<Sprite> ("skins/player/facialHair");
Sprite[] shoesSprites = Resources.LoadAll <Sprite> ("skins/player/shoes");
<Sprite> ("skins/player/hats"); Sprite[] hatSprites = Resources.LoadAll
SpriteRenderer> SpriteRenderer[] renderers = GetComponentsInChildren< ();
<SpriteRenderer> facialHairRenderersToSet = GetSpriteRenderersWithName ("FacialHair", renderers); List<SpriteRenderer> hatRenderersToSet = GetSpriteRenderersWithName ("Hat", renderers); List
<SpriteRenderer> shoeRenderersToSet = GetSpriteRenderersWithName ("Shoe", renderers); List
<SpriteRenderer> renderers, string costumeName) { Sprite facialHairSprite = GetSpriteWithName (costumeName, facialHairSprites); Sprite hatSprite = GetSpriteWithName (costumeName, hatSprites); Sprite shoeSprite = GetSpriteWithName (costumeName, shoesSprites); CustomisePlayer (hatSprite, hatRenderersToSet, costumeName); CustomisePlayer (facialHairSprite, facialHairRenderersToSet, costumeName); CustomisePlayer (shoeSprite, shoeRenderersToSet, costumeName); } /*** * Loop through the SpriteRenderers and set the correct sprite for them */ public void CustomisePlayer(Sprite sprite, List
<SpriteRenderer> GetSpriteRenderersWithName(string rendererName, SpriteRenderer[] renderers) { foreach (SpriteRenderer renderer in renderers) { renderer.sprite = sprite; } } /*** * Convenience method to get the Sprite with a name. */ Sprite GetSpriteWithName(string spriteName, Sprite[] sprites) { foreach (Sprite sprite in sprites) { if (sprite.name == costumeName) { return sprite; } } return null; } /*** * Get a list of all the SpriteRenderers with a specific name */ List
<SpriteRenderer> spriteRenderers = new List<SpriteRenderer> (); List
  foreach (SpriteRenderer renderer in renderers) {
   if (renderer.name == rendererName) {
    spriteRenderers.Add (renderer);
   }
  }
  return spriteRenderers;
 }
}
fun main(args: Array<String>) {
    var list = mutableListOf<String>("zero", "one", "two", "three", "four")

    list.add("five")
    list.remove("zero")

    for(str in list) {
        println("value = " + str)
    }
}
value = one
value = two
value = three
value = four
value = five
fun main(args: Array<String>) {
    var array = arrayOf("one", "two", "three", "four")
    for(str in array) {
        println("value = " + str)
    }
}
This produces the following output:value = one value = two value = three value = four


using System.Collections;
using System.Collections.Generic;
using System.IO;
using System.Runtime.InteropServices;
using UnityEngine;

public class Share : MonoBehaviour {
 public string title;
 public string bodyText;

 public void SaveAndShareImage() {
  string destination = Path.Combine(Application.persistentDataPath, "test.png");
  SaveImage (destination);
  ShareImage (destination, title,
   bodyText);
 }

 void ShareImage(string imageLocation, string titleText, string bodyText) {
  #if UNITY_IOS
  CallSocialShareAdvanced(bodyText, titleText, "", imageLocation);
  #endif

  #if UNITY_ANDROID
  AndroidJavaClass intentClass = new AndroidJavaClass("android.content.Intent");
  AndroidJavaObject intentObject = new AndroidJavaObject("android.content.Intent");
  intentObject.Call("setAction", intentClass.GetStatic("ACTION_SEND"));
  AndroidJavaClass uriClass = new AndroidJavaClass("android.net.Uri");
  AndroidJavaObject uriObject = uriClass.CallStatic("parse","file://" + imageLocation);
  intentObject.Call("putExtra", intentClass.GetStatic("EXTRA_STREAM"), uriObject);
  intentObject.Call("putExtra", intentClass.GetStatic("EXTRA_TEXT"), bodyText);
  intentObject.Call("putExtra", intentClass.GetStatic("EXTRA_SUBJECT"), titleText);
  intentObject.Call("setType", "image/jpeg");
  AndroidJavaClass unity = new AndroidJavaClass("com.unity3d.player.UnityPlayer");
  AndroidJavaObject currentActivity = unity.GetStatic("currentActivity");

  currentActivity.Call("startActivity", intentObject);
  #endif
 }

 void SaveImage(string destination) {
  Texture2D screenTexture = new Texture2D(Screen.width, Screen.height, TextureFormat.RGB24, true);
  screenTexture.ReadPixels(new Rect(0, 0, Screen.width, Screen.height),0,0);
  screenTexture.Apply();
  byte[] dataToSave = screenTexture.EncodeToPNG();
  File.WriteAllBytes(destination, dataToSave);
 }

 #if UNITY_IOS
 public struct ConfigStruct
 {
  public string title;
  public string message;
 }

 [DllImport ("__Internal")] private static extern void showAlertMessage(ref ConfigStruct conf);

 public struct SocialSharingStruct
 {
  public string text;
  public string url;
  public string image;
  public string subject;
 }

 [DllImport ("__Internal")] private static extern void showSocialSharing(ref SocialSharingStruct conf);

 public static void CallSocialShare(string title, string message)
 {
  ConfigStruct conf = new ConfigStruct();
  conf.title  = title;
  conf.message = message;
  showAlertMessage(ref conf);
 }


 public static void CallSocialShareAdvanced(string defaultTxt, string subject, string url, string img)
 {
  SocialSharingStruct conf = new SocialSharingStruct();
  conf.text = defaultTxt;
  conf.url = url;
  conf.image = img;
  conf.subject = subject;

  showSocialSharing(ref conf);
 }
 #endif
}
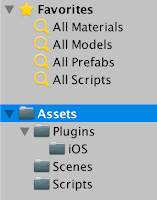
Plugins/iOS/iOSNativeShare.h
Plugins/iOS/iOSNativeShare.m
Then make sure that these files have the following Objective C code. The following code was taken from https://github.com/ChrisMaire/unity-native-sharing Plugins/iOS/iOSNativeShare.h
#import "UnityAppController.h"

@interface iOSNativeShare : UIViewController
{
    UINavigationController *navController;
}


struct ConfigStruct {
    char* title;
    char* message;
};

struct SocialSharingStruct {
    char* text;
    char* url;
    char* image;
    char* subject;
};


#ifdef __cplusplus
extern "C" {
#endif

    void showAlertMessage(struct ConfigStruct *confStruct);
    void showSocialSharing(struct SocialSharingStruct *confStruct);

#ifdef __cplusplus
}
#endif


@end
#import "iOSNativeShare.h"

@implementation iOSNativeShare{
}

#ifdef UNITY_4_0 || UNITY_5_0

#import "iPhone_View.h"

#else

extern UIViewController* UnityGetGLViewController();

#endif

+(id) withTitle:(char*)title withMessage:(char*)message{

 return [[iOSNativeShare alloc] initWithTitle:title withMessage:message];
}

-(id) initWithTitle:(char*)title withMessage:(char*)message{

 self = [super init];

 if( !self ) return self;

 ShowAlertMessage([[NSString alloc] initWithUTF8String:title], [[NSString alloc] initWithUTF8String:message]);

 return self;

}

void ShowAlertMessage (NSString *title, NSString *message){

 UIAlertView *alert = [[UIAlertView alloc] initWithTitle:title

                       message:message

                       delegate:nil

                       cancelButtonTitle:@"OK"

                       otherButtonTitles: nil];

 [alert show];

}

+(id) withText:(char*)text withURL:(char*)url withImage:(char*)image withSubject:(char*)subject{

 return [[iOSNativeShare alloc] initWithText:text withURL:url withImage:image withSubject:subject];
}

-(id) initWithText:(char*)text withURL:(char*)url withImage:(char*)image withSubject:(char*)subject{

 self = [super init];

 if( !self ) return self;


    NSString *mText = text ? [[NSString alloc] initWithUTF8String:text] : nil;

    NSString *mUrl = url ? [[NSString alloc] initWithUTF8String:url] : nil;

    NSString *mImage = image ? [[NSString alloc] initWithUTF8String:image] : nil;

    NSString *mSubject = subject ? [[NSString alloc] initWithUTF8String:subject] : nil;


 NSMutableArray *items = [NSMutableArray new];

 if(mText != NULL && mText.length > 0){

  [items addObject:mText];

 }

 if(mUrl != NULL && mUrl.length > 0){

  NSURL *formattedURL = [NSURL URLWithString:mUrl];

  [items addObject:formattedURL];

 }
 if(mImage != NULL && mImage.length > 0){

  if([mImage hasPrefix:@"http"])
  {
   NSURL *urlImage = [NSURL URLWithString:mImage];

            NSError *error = nil;
            NSData *dataImage = [NSData dataWithContentsOfURL:urlImage options:0 error:&error];

            if (!error) {
                UIImage *imageFromUrl = [UIImage imageWithData:dataImage];
                [items addObject:imageFromUrl];
            } else {
                ShowAlertMessage(@"Error", @"Cannot load image");
            }
        }
        else if ( [self isStringValideBase64:mImage]){
            NSData* imageBase64Data = [[NSData alloc]initWithBase64Encoding:mImage];
            UIImage* image = [UIImage imageWithData:imageBase64Data];
            if (image!= nil){
                [items addObject:image];
            }
            else{
                ShowAlertMessage(@"Error", @"Cannot load image");
            }
        }
        else{
   NSFileManager *fileMgr = [NSFileManager defaultManager];
   if([fileMgr fileExistsAtPath:mImage]){

    NSData *dataImage = [NSData dataWithContentsOfFile:mImage];

    UIImage *imageFromUrl = [UIImage imageWithData:dataImage];

    [items addObject:imageFromUrl];
   }else{
    ShowAlertMessage(@"Error", @"Cannot find image");
   }
  }
 }

 UIActivityViewController *activity = [[UIActivityViewController alloc] initWithActivityItems:items applicationActivities:Nil];

    if(mSubject != NULL) {
        [activity setValue:mSubject forKey:@"subject"];
    } else {
        [activity setValue:@"" forKey:@"subject"];
    }

 UIViewController *rootViewController = UnityGetGLViewController();
    //if iPhone
    if (UI_USER_INTERFACE_IDIOM() == UIUserInterfaceIdiomPhone) {
          [rootViewController presentViewController:activity animated:YES completion:Nil];
    }
    //if iPad
    else {
        // Change Rect to position Popover
        UIPopoverController *popup = [[UIPopoverController alloc] initWithContentViewController:activity];
        [popup presentPopoverFromRect:CGRectMake(rootViewController.view.frame.size.width/2, rootViewController.view.frame.size.height/4, 0, 0)inView:rootViewController.view permittedArrowDirections:UIPopoverArrowDirectionAny animated:YES];
    }
    return self;
}

-(BOOL) isStringValideBase64:(NSString*)string{

    NSString *regExPattern = @"^(?:[A-Za-z0-9+/]{4})*(?:[A-Za-z0-9+/]{2}==|[A-Za-z0-9+/]{3}=)?$";

    NSRegularExpression *regEx = [[NSRegularExpression alloc] initWithPattern:regExPattern options:NSRegularExpressionCaseInsensitive error:nil];
    NSUInteger regExMatches = [regEx numberOfMatchesInString:string options:0 range:NSMakeRange(0, [string length])];
    return regExMatches != 0;
}

# pragma mark - C API
iOSNativeShare* instance;

void showAlertMessage(struct ConfigStruct *confStruct) {
 instance = [iOSNativeShare withTitle:confStruct->title withMessage:confStruct->message];
}

void showSocialSharing(struct SocialSharingStruct *confStruct) {
 instance = [iOSNativeShare withText:confStruct->text withURL:confStruct->url withImage:confStruct->image withSubject:confStruct->subject];
}

@end
mkdir <project name>
cd <project name>
git init --bare
git clone ssh://<username>@<raspberry pi ip or hostname>:<path to repo>/<repo name>
git push origin master