Here's what the main character looks like without any costume on.
The player can then change the costumes of the main character. Here's an example of main character re-skinned with different costumes.
The player is split into different sprites. There is a sprite sheet for common player sprites for all costumes and a sprite sheet for each of the different parts of the character that can be re-skinned. This is what the main sprite sheet looks like.
There are also other sprite sheets for the Hats, shoes and facial hair. These are all stored in the Assets/Resources/Skins/Player directory.
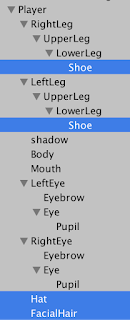
The player then has different GameObjects for different areas to be skinned. In this case it is a Hat, Facial Hair and Shoes. The hierarchy can be seen here for the player.
Each of these components are just an empty GameObject with just a SpriteRenderer component.
You can see from the image from the inspector above that these don't have a sprite assigned to them. We are going to add a script to do this at runtime.
The script expects the sprite sheet to have been split up into sprites using the Sprite Editor. In the image below you can see that the different sprite sheets are split up into Elf, Leprechaun, Pirate, Santa, Viking sprites. This naming pattern has to be followed for other sprite sheets for the below code to work.
The following script does this by checking if a costume change is needed in the Update method, if it does the ChangeCostume method is called.
The ChangeCostume method works by loading in the facialHair.png, hats.png and shoes.png sprite sheets and stores them into sprite arrays. It gets the lists of SpriteRenderers to set. It also gets the sprite that the SpriteRenderer is going to be set to and sets it.
For example the following code loads in the sprite sheet Assets/Resources/skins/player/hats.png. The elements of the array are the Sprites in the image above. The renderers array contains all the SpriteRenderer components in the Player GameObject. We are only interested in the "Hat" SpriteRenderer so we call the GetSpriteRenderersWithName method and pass in "Hat". We then get the target sprite to set in the SpriteRenderer and we set it.
Sprite[] hatSprites = Resources.LoadAll ("skins/player/hats");
SpriteRenderer[] renderers = GetComponentsInChildren ();
List<SpriteRenderer> hatRenderersToSet = GetSpriteRenderersWithName ("Hat", renderers);
Sprite hatSprite = GetSpriteWithName (costumeName, hatSprites);
CustomisePlayer (hatSprite, hatRenderersToSet, costumeName);
Here's the entire code for the class.
using System.Collections;
using System.Collections.Generic;
using UnityEngine;
public class Reskin : MonoBehaviour {
public string costumeName;
string currentCostume;
void Start () {
currentCostume = costumeName;
ChangeCostume (currentCostume);
}
void Update () {
//only change the costume if the costume has to be changed
if (costumeName != currentCostume) {
ChangeCostume (costumeName);
currentCostume = costumeName;
}
}
public void ChangeCostume(string costumeName) {
Sprite[] facialHairSprites = Resources.LoadAll<Sprite> ("skins/player/facialHair");
Sprite[] shoesSprites = Resources.LoadAll <Sprite> ("skins/player/shoes");
<Sprite> ("skins/player/hats"); Sprite[] hatSprites = Resources.LoadAll
SpriteRenderer> SpriteRenderer[] renderers = GetComponentsInChildren< ();
<SpriteRenderer> facialHairRenderersToSet = GetSpriteRenderersWithName ("FacialHair", renderers); List<SpriteRenderer> hatRenderersToSet = GetSpriteRenderersWithName ("Hat", renderers); List
<SpriteRenderer> shoeRenderersToSet = GetSpriteRenderersWithName ("Shoe", renderers); List
<SpriteRenderer> renderers, string costumeName) { Sprite facialHairSprite = GetSpriteWithName (costumeName, facialHairSprites); Sprite hatSprite = GetSpriteWithName (costumeName, hatSprites); Sprite shoeSprite = GetSpriteWithName (costumeName, shoesSprites); CustomisePlayer (hatSprite, hatRenderersToSet, costumeName); CustomisePlayer (facialHairSprite, facialHairRenderersToSet, costumeName); CustomisePlayer (shoeSprite, shoeRenderersToSet, costumeName); } /*** * Loop through the SpriteRenderers and set the correct sprite for them */ public void CustomisePlayer(Sprite sprite, List
<SpriteRenderer> GetSpriteRenderersWithName(string rendererName, SpriteRenderer[] renderers) { foreach (SpriteRenderer renderer in renderers) { renderer.sprite = sprite; } } /*** * Convenience method to get the Sprite with a name. */ Sprite GetSpriteWithName(string spriteName, Sprite[] sprites) { foreach (Sprite sprite in sprites) { if (sprite.name == costumeName) { return sprite; } } return null; } /*** * Get a list of all the SpriteRenderers with a specific name */ List
<SpriteRenderer> spriteRenderers = new List<SpriteRenderer> (); List
  foreach (SpriteRenderer renderer in renderers) {
   if (renderer.name == rendererName) {
    spriteRenderers.Add (renderer);
   }
  }
  return spriteRenderers;
 }
}
The costumes can be seen in this video at 0:39
Stop the Pop can be downloaded on The App Store: https://itunes.apple.com/us/app/stop-the-pop/id1166315634?ls=1&mt=8
Google Play: https://play.google.com/store/apps/details?id=com.stopthepopgame.stopthepop


