The pinout command gives this summary.
This is what the output looks like. From this you can see that the Raspberry Pi Model is 3B V1.2

import org.junit.jupiter.api.Test;
import org.junit.jupiter.params.ParameterizedTest;
import org.junit.jupiter.params.provider.MethodSource;

import java.util.stream.Stream;

import static org.junit.jupiter.api.Assertions.assertTrue;

public class ParametrizedTest {

    @Test
    @ParameterizedTest
    @MethodSource("stringProvider")
    void test(String string) {
        assertTrue(true);
    }

    public static Stream stringProvider() {
        return Stream.of("", null, "123");
    }
}
import org.junit.jupiter.api.Test;
import org.junit.jupiter.params.ParameterizedTest;
import org.junit.jupiter.params.provider.MethodSource;

import java.util.stream.Stream;

import static org.junit.jupiter.api.Assertions.assertTrue;

public class ParametrizedTest {

    @ParameterizedTest
    @MethodSource("stringProvider")
    void test(String string) {
        assertTrue(true);
    }

    public static Stream stringProvider() {
        return Stream.of("", null, "123");
    }
}

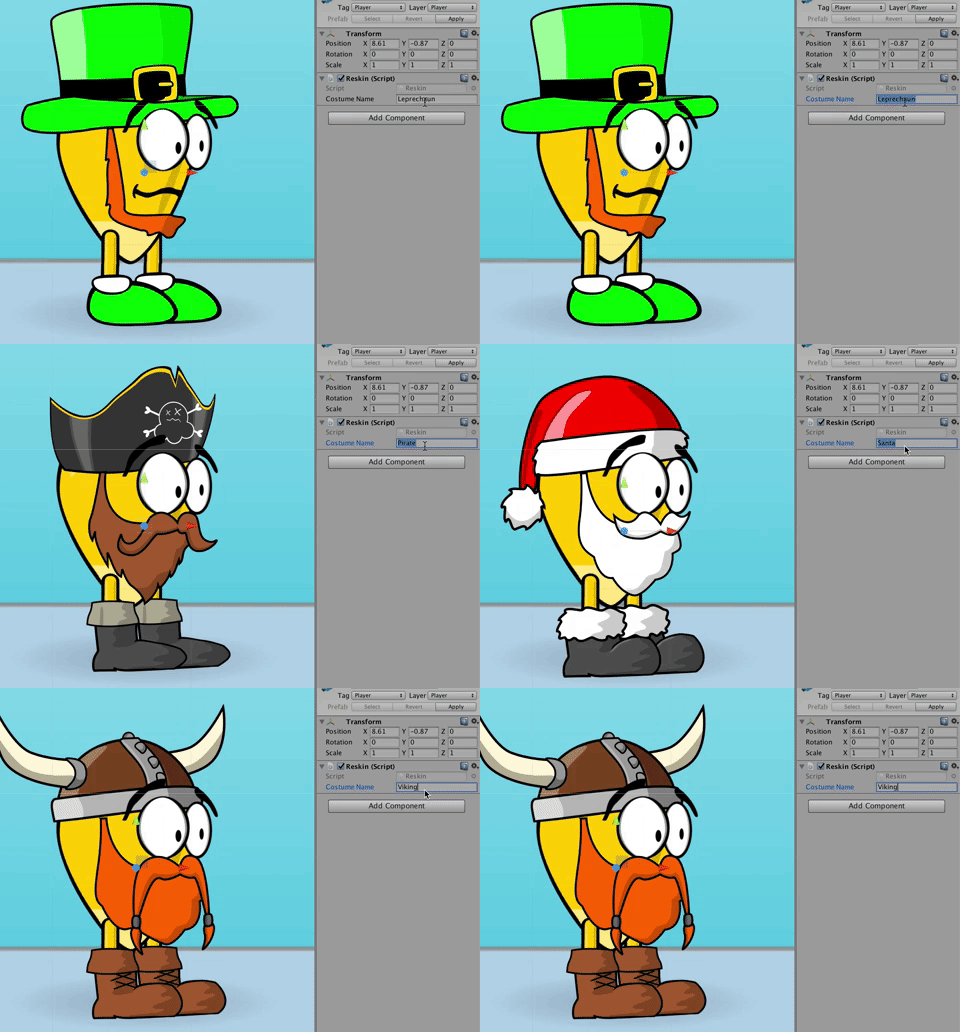


using System.Collections;
using System.Collections.Generic;
using UnityEngine;
public class Reskin : MonoBehaviour {
public string costumeName;
string currentCostume;
void Start () {
currentCostume = costumeName;
ChangeCostume (currentCostume);
}
void Update () {
//only change the costume if the costume has to be changed
if (costumeName != currentCostume) {
ChangeCostume (costumeName);
currentCostume = costumeName;
}
}
public void ChangeCostume(string costumeName) {
Sprite[] facialHairSprites = Resources.LoadAll<Sprite> ("skins/player/facialHair");
Sprite[] shoesSprites = Resources.LoadAll <Sprite> ("skins/player/shoes");
<Sprite> ("skins/player/hats"); Sprite[] hatSprites = Resources.LoadAll
SpriteRenderer> SpriteRenderer[] renderers = GetComponentsInChildren< ();
<SpriteRenderer> facialHairRenderersToSet = GetSpriteRenderersWithName ("FacialHair", renderers); List<SpriteRenderer> hatRenderersToSet = GetSpriteRenderersWithName ("Hat", renderers); List
<SpriteRenderer> shoeRenderersToSet = GetSpriteRenderersWithName ("Shoe", renderers); List
<SpriteRenderer> renderers, string costumeName) { Sprite facialHairSprite = GetSpriteWithName (costumeName, facialHairSprites); Sprite hatSprite = GetSpriteWithName (costumeName, hatSprites); Sprite shoeSprite = GetSpriteWithName (costumeName, shoesSprites); CustomisePlayer (hatSprite, hatRenderersToSet, costumeName); CustomisePlayer (facialHairSprite, facialHairRenderersToSet, costumeName); CustomisePlayer (shoeSprite, shoeRenderersToSet, costumeName); } /*** * Loop through the SpriteRenderers and set the correct sprite for them */ public void CustomisePlayer(Sprite sprite, List
<SpriteRenderer> GetSpriteRenderersWithName(string rendererName, SpriteRenderer[] renderers) { foreach (SpriteRenderer renderer in renderers) { renderer.sprite = sprite; } } /*** * Convenience method to get the Sprite with a name. */ Sprite GetSpriteWithName(string spriteName, Sprite[] sprites) { foreach (Sprite sprite in sprites) { if (sprite.name == costumeName) { return sprite; } } return null; } /*** * Get a list of all the SpriteRenderers with a specific name */ List
<SpriteRenderer> spriteRenderers = new List<SpriteRenderer> (); List
  foreach (SpriteRenderer renderer in renderers) {
   if (renderer.name == rendererName) {
    spriteRenderers.Add (renderer);
   }
  }
  return spriteRenderers;
 }
}
fun main(args: Array<String>) {
    var list = mutableListOf<String>("zero", "one", "two", "three", "four")

    list.add("five")
    list.remove("zero")

    for(str in list) {
        println("value = " + str)
    }
}
value = one
value = two
value = three
value = four
value = five
fun main(args: Array<String>) {
    var array = arrayOf("one", "two", "three", "four")
    for(str in array) {
        println("value = " + str)
    }
}
This produces the following output:value = one value = two value = three value = four


using System.Collections;
using System.Collections.Generic;
using System.IO;
using System.Runtime.InteropServices;
using UnityEngine;

public class Share : MonoBehaviour {
 public string title;
 public string bodyText;

 public void SaveAndShareImage() {
  string destination = Path.Combine(Application.persistentDataPath, "test.png");
  SaveImage (destination);
  ShareImage (destination, title,
   bodyText);
 }

 void ShareImage(string imageLocation, string titleText, string bodyText) {
  #if UNITY_IOS
  CallSocialShareAdvanced(bodyText, titleText, "", imageLocation);
  #endif

  #if UNITY_ANDROID
  AndroidJavaClass intentClass = new AndroidJavaClass("android.content.Intent");
  AndroidJavaObject intentObject = new AndroidJavaObject("android.content.Intent");
  intentObject.Call("setAction", intentClass.GetStatic("ACTION_SEND"));
  AndroidJavaClass uriClass = new AndroidJavaClass("android.net.Uri");
  AndroidJavaObject uriObject = uriClass.CallStatic("parse","file://" + imageLocation);
  intentObject.Call("putExtra", intentClass.GetStatic("EXTRA_STREAM"), uriObject);
  intentObject.Call("putExtra", intentClass.GetStatic("EXTRA_TEXT"), bodyText);
  intentObject.Call("putExtra", intentClass.GetStatic("EXTRA_SUBJECT"), titleText);
  intentObject.Call("setType", "image/jpeg");
  AndroidJavaClass unity = new AndroidJavaClass("com.unity3d.player.UnityPlayer");
  AndroidJavaObject currentActivity = unity.GetStatic("currentActivity");

  currentActivity.Call("startActivity", intentObject);
  #endif
 }

 void SaveImage(string destination) {
  Texture2D screenTexture = new Texture2D(Screen.width, Screen.height, TextureFormat.RGB24, true);
  screenTexture.ReadPixels(new Rect(0, 0, Screen.width, Screen.height),0,0);
  screenTexture.Apply();
  byte[] dataToSave = screenTexture.EncodeToPNG();
  File.WriteAllBytes(destination, dataToSave);
 }

 #if UNITY_IOS
 public struct ConfigStruct
 {
  public string title;
  public string message;
 }

 [DllImport ("__Internal")] private static extern void showAlertMessage(ref ConfigStruct conf);

 public struct SocialSharingStruct
 {
  public string text;
  public string url;
  public string image;
  public string subject;
 }

 [DllImport ("__Internal")] private static extern void showSocialSharing(ref SocialSharingStruct conf);

 public static void CallSocialShare(string title, string message)
 {
  ConfigStruct conf = new ConfigStruct();
  conf.title  = title;
  conf.message = message;
  showAlertMessage(ref conf);
 }


 public static void CallSocialShareAdvanced(string defaultTxt, string subject, string url, string img)
 {
  SocialSharingStruct conf = new SocialSharingStruct();
  conf.text = defaultTxt;
  conf.url = url;
  conf.image = img;
  conf.subject = subject;

  showSocialSharing(ref conf);
 }
 #endif
}
Plugins/iOS/iOSNativeShare.h
Plugins/iOS/iOSNativeShare.m
Then make sure that these files have the following Objective C code. The following code was taken from https://github.com/ChrisMaire/unity-native-sharing Plugins/iOS/iOSNativeShare.h
#import "UnityAppController.h"

@interface iOSNativeShare : UIViewController
{
    UINavigationController *navController;
}


struct ConfigStruct {
    char* title;
    char* message;
};

struct SocialSharingStruct {
    char* text;
    char* url;
    char* image;
    char* subject;
};


#ifdef __cplusplus
extern "C" {
#endif

    void showAlertMessage(struct ConfigStruct *confStruct);
    void showSocialSharing(struct SocialSharingStruct *confStruct);

#ifdef __cplusplus
}
#endif


@end
#import "iOSNativeShare.h"

@implementation iOSNativeShare{
}

#ifdef UNITY_4_0 || UNITY_5_0

#import "iPhone_View.h"

#else

extern UIViewController* UnityGetGLViewController();

#endif

+(id) withTitle:(char*)title withMessage:(char*)message{

 return [[iOSNativeShare alloc] initWithTitle:title withMessage:message];
}

-(id) initWithTitle:(char*)title withMessage:(char*)message{

 self = [super init];

 if( !self ) return self;

 ShowAlertMessage([[NSString alloc] initWithUTF8String:title], [[NSString alloc] initWithUTF8String:message]);

 return self;

}

void ShowAlertMessage (NSString *title, NSString *message){

 UIAlertView *alert = [[UIAlertView alloc] initWithTitle:title

                       message:message

                       delegate:nil

                       cancelButtonTitle:@"OK"

                       otherButtonTitles: nil];

 [alert show];

}

+(id) withText:(char*)text withURL:(char*)url withImage:(char*)image withSubject:(char*)subject{

 return [[iOSNativeShare alloc] initWithText:text withURL:url withImage:image withSubject:subject];
}

-(id) initWithText:(char*)text withURL:(char*)url withImage:(char*)image withSubject:(char*)subject{

 self = [super init];

 if( !self ) return self;


    NSString *mText = text ? [[NSString alloc] initWithUTF8String:text] : nil;

    NSString *mUrl = url ? [[NSString alloc] initWithUTF8String:url] : nil;

    NSString *mImage = image ? [[NSString alloc] initWithUTF8String:image] : nil;

    NSString *mSubject = subject ? [[NSString alloc] initWithUTF8String:subject] : nil;


 NSMutableArray *items = [NSMutableArray new];

 if(mText != NULL && mText.length > 0){

  [items addObject:mText];

 }

 if(mUrl != NULL && mUrl.length > 0){

  NSURL *formattedURL = [NSURL URLWithString:mUrl];

  [items addObject:formattedURL];

 }
 if(mImage != NULL && mImage.length > 0){

  if([mImage hasPrefix:@"http"])
  {
   NSURL *urlImage = [NSURL URLWithString:mImage];

            NSError *error = nil;
            NSData *dataImage = [NSData dataWithContentsOfURL:urlImage options:0 error:&error];

            if (!error) {
                UIImage *imageFromUrl = [UIImage imageWithData:dataImage];
                [items addObject:imageFromUrl];
            } else {
                ShowAlertMessage(@"Error", @"Cannot load image");
            }
        }
        else if ( [self isStringValideBase64:mImage]){
            NSData* imageBase64Data = [[NSData alloc]initWithBase64Encoding:mImage];
            UIImage* image = [UIImage imageWithData:imageBase64Data];
            if (image!= nil){
                [items addObject:image];
            }
            else{
                ShowAlertMessage(@"Error", @"Cannot load image");
            }
        }
        else{
   NSFileManager *fileMgr = [NSFileManager defaultManager];
   if([fileMgr fileExistsAtPath:mImage]){

    NSData *dataImage = [NSData dataWithContentsOfFile:mImage];

    UIImage *imageFromUrl = [UIImage imageWithData:dataImage];

    [items addObject:imageFromUrl];
   }else{
    ShowAlertMessage(@"Error", @"Cannot find image");
   }
  }
 }

 UIActivityViewController *activity = [[UIActivityViewController alloc] initWithActivityItems:items applicationActivities:Nil];

    if(mSubject != NULL) {
        [activity setValue:mSubject forKey:@"subject"];
    } else {
        [activity setValue:@"" forKey:@"subject"];
    }

 UIViewController *rootViewController = UnityGetGLViewController();
    //if iPhone
    if (UI_USER_INTERFACE_IDIOM() == UIUserInterfaceIdiomPhone) {
          [rootViewController presentViewController:activity animated:YES completion:Nil];
    }
    //if iPad
    else {
        // Change Rect to position Popover
        UIPopoverController *popup = [[UIPopoverController alloc] initWithContentViewController:activity];
        [popup presentPopoverFromRect:CGRectMake(rootViewController.view.frame.size.width/2, rootViewController.view.frame.size.height/4, 0, 0)inView:rootViewController.view permittedArrowDirections:UIPopoverArrowDirectionAny animated:YES];
    }
    return self;
}

-(BOOL) isStringValideBase64:(NSString*)string{

    NSString *regExPattern = @"^(?:[A-Za-z0-9+/]{4})*(?:[A-Za-z0-9+/]{2}==|[A-Za-z0-9+/]{3}=)?$";

    NSRegularExpression *regEx = [[NSRegularExpression alloc] initWithPattern:regExPattern options:NSRegularExpressionCaseInsensitive error:nil];
    NSUInteger regExMatches = [regEx numberOfMatchesInString:string options:0 range:NSMakeRange(0, [string length])];
    return regExMatches != 0;
}

# pragma mark - C API
iOSNativeShare* instance;

void showAlertMessage(struct ConfigStruct *confStruct) {
 instance = [iOSNativeShare withTitle:confStruct->title withMessage:confStruct->message];
}

void showSocialSharing(struct SocialSharingStruct *confStruct) {
 instance = [iOSNativeShare withText:confStruct->text withURL:confStruct->url withImage:confStruct->image withSubject:confStruct->subject];
}

@end
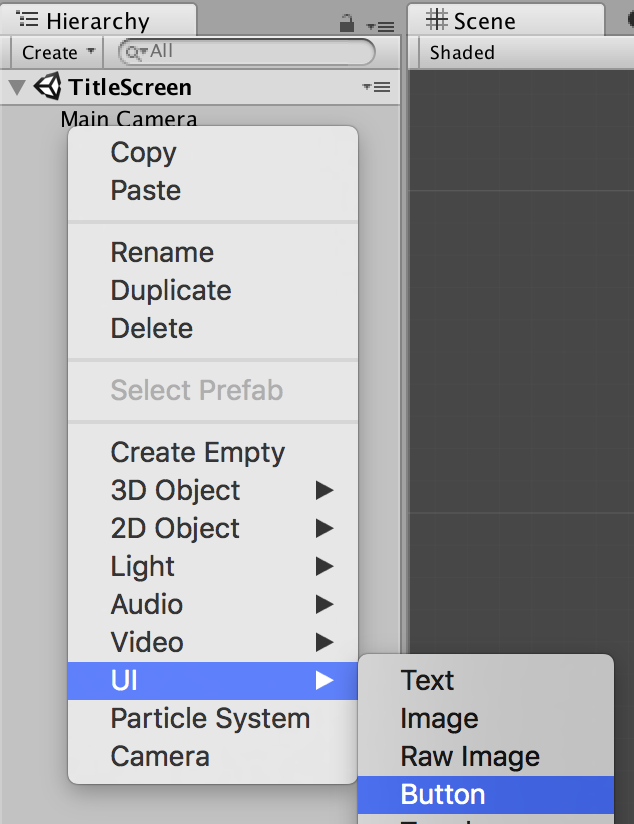


mkdir <project name>
cd <project name>
git init --bare
git clone ssh://<username>@<raspberry pi ip or hostname>:<path to repo>/<repo name>
git push origin master


using UnityEngine;
using System.Collections;
using System.Collections.Generic;

/***
 * Programatically generate a list of GameObjects at random positions
 * between xOffset to xLength, yOffset to yLength and zOffset to zLength.
 */
public class GameObjectGenerator : MonoBehaviour {

 /***
  * The maximum number of objects to get generated
  */
 public int maxObjects = 10;

 /***
  * The type of game object to generate
  */
 public GameObject generatedObjectType;

 /***
  * The x-axis offset to position the game objects
  */
 public float xOffset = 0f;
 /***
  * The y-axis offset to position the game objects
  */
 public float yOffset = 0f;
 /***
  * The z-axis offset to position the game objects
  */
 public float zOffset = 0f;

 /***
  * The length of the level on the x-axis
  */
 public float xLength = 10f;
 /***
  * The length of the level on the y-axis
  */
 public float yLength = 10f;
 /***
  * The length of the level on the z-axis
  */
 public float zLength = 10f;

 /***
  * Internal list of all the generated game objects.
  */
 private List gameObjects;

 void Start () {
  gameObjects = new List();
  generateGameObjects ();
 }

 public void generateGameObjects() {
  for (int i = 0; i < maxObjects; i++) {
   //get a random value between the offset and the length
   float xPos = Mathf.Clamp(xOffset + Random.value * xLength, xOffset, xLength);
   float yPos = Mathf.Clamp(yOffset + Random.value * yLength, yOffset, yLength);
   float zPos = Mathf.Clamp(zOffset + Random.value * zLength, zOffset, zLength);

   Vector3 position = new Vector3 (xPos, yPos, zPos);

   GameObject gameObject = (GameObject)Instantiate (generatedObjectType, position, Quaternion.identity);
   gameObjects.Add(gameObject);
  }
 }
}

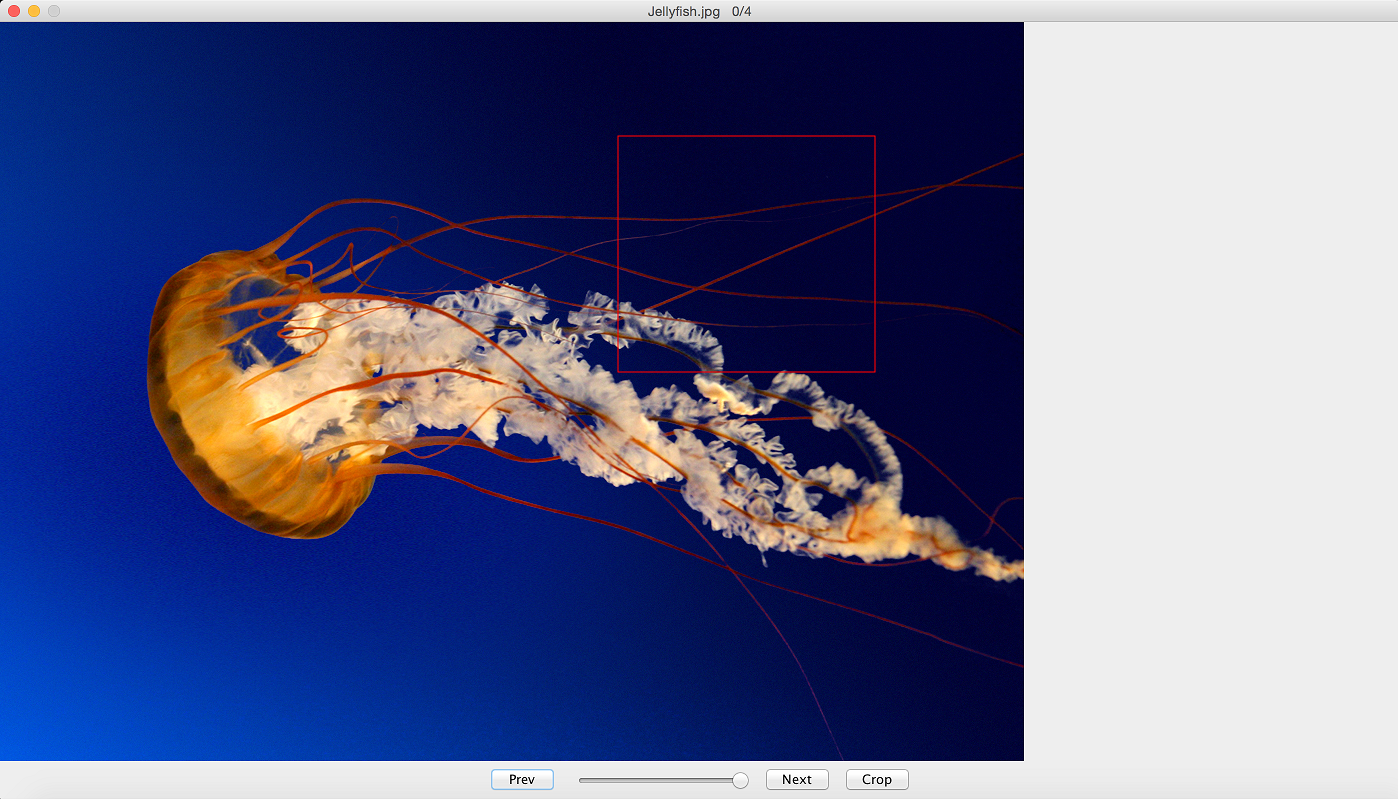
package photocropper;

import java.awt.BorderLayout;
import java.awt.Dimension;
import java.awt.event.ActionEvent;
import java.awt.image.BufferedImage;
import java.io.File;
import java.io.IOException;
import java.util.ArrayList;

import javax.swing.JButton;
import javax.swing.JFileChooser;
import javax.swing.JFrame;
import javax.swing.JOptionPane;
import javax.swing.JPanel;
import javax.swing.JSlider;
import javax.swing.event.ChangeEvent;

/***
 * This is the main class of the application. It constructs the UI and
 * registers event listeners,
 * @author andrew
 *
 */
public class PhotoCropper {

	private ArrayList photos;
	private int currentImageIndex = -1;
	private String directory;

	public PhotoCropper() throws Exception {
		frame = new JFrame();
		panel = new ImagePanel();

		while((directory = getPhotoDirectory()) == null) {
			System.err.println("This application needs to have a photo directory. Exiting...");
			System.exit(1);
		}

		String[] files = Utils.getFiles(directory);

		ArrayList fileList = Utils.toArrayList(files);
		Utils.filterNonImages(fileList);
		photos = fileList;

		panel.setOutputDirectory(directory + File.separator + "cropped");

		CropMouseListener cropListener = new CropMouseListener(panel);
		panel.addMouseListener(cropListener);
		panel.addMouseMotionListener(cropListener);

		if(photos.size() > 0) {
			BufferedImage img = Utils.loadImage(directory, photos.get(0));
			frame.setTitle(photos.get(0)+ "\t" + 0 + "/" + photos.size());
			currentImageIndex = 0;
			panel.changeImage(img);
		}

		JPanel controlPanel = new JPanel();

		btnNext = new JButton("Next");
		btnPrev = new JButton("Prev");
		btnCrop = new JButton("Crop");

		sliderZoom = new JSlider(1, 100);
		sliderZoom.setValue(100);
		setUpListeners();
		controlPanel.add(btnPrev);
		controlPanel.add(sliderZoom);
		controlPanel.add(btnNext);
		controlPanel.add(btnCrop);

		//set resizeable to false so the resize will not interfere
		//when interacting with images close to the border
		frame.setResizable(false);

		frame.add(controlPanel, BorderLayout.SOUTH);

		frame.add(panel, BorderLayout.CENTER);

		frame.setSize(new Dimension(1400,800));
		frame.setDefaultCloseOperation(JFrame.EXIT_ON_CLOSE);
		frame.setVisible(true);
	}

	/***
	 *
	 * @return
	 */
	public String getPhotoDirectory() {
		JFileChooser fileChooser = new JFileChooser();
		String dir = null;
		fileChooser.setDialogTitle("Select Photo Directory");

		fileChooser.setFileSelectionMode(JFileChooser.DIRECTORIES_ONLY);

		int returnVal = fileChooser.showOpenDialog(frame);
		if (returnVal == JFileChooser.APPROVE_OPTION) {
			dir = fileChooser.getSelectedFile().getAbsolutePath();
		}

		return dir;
	}

	public void setUpListeners() {
		btnNext.addActionListener((ActionEvent evt) -> {
			if((currentImageIndex + 1) >= photos.size()) {
				currentImageIndex = 0;
			}
			else {
				currentImageIndex++;
			}

			try {
				BufferedImage prevImage = Utils.loadImage(directory, photos.get(currentImageIndex));
				frame.setTitle(photos.get(currentImageIndex) + "\t" + currentImageIndex + "/" + photos.size());
				panel.changeImage(prevImage);
				frame.repaint();
			}
			catch(IOException e) {
				System.err.println("ERROR: could not load " + photos.get(currentImageIndex));
				e.printStackTrace();
			}
		});

		btnPrev.addActionListener((ActionEvent evt) -> {
			if((currentImageIndex - 1) < 0) {
				currentImageIndex = photos.size() -1;
			}
			else {
				currentImageIndex--;
			}

			try {
				BufferedImage prevImage = Utils.loadImage(directory, photos.get(currentImageIndex));
				frame.setTitle(photos.get(currentImageIndex) + "\t" + currentImageIndex + "/" + photos.size());
				panel.changeImage(prevImage);
				frame.repaint();
			}
			catch(IOException e) {
				System.err.println("ERROR: could not load " + photos.get(currentImageIndex));
				e.printStackTrace();
			}
		});

		btnCrop.addActionListener((ActionEvent evt) -> {
			try{
				panel.crop();
			}
			catch(Exception e) {
				JOptionPane.showMessageDialog(frame,
					    "Could not crop image. Bad image selection",
					    "Crop Error",
					    JOptionPane.ERROR_MESSAGE);
			}
		});

		sliderZoom.addChangeListener((ChangeEvent e) -> {
			double value = sliderZoom.getValue();
			double zoom = value / 100.0;
			panel.setZoom(zoom);
		});
	}

	public static void main(String[] args) {
		try {
			new PhotoCropper();
		}
		catch(Exception e) {
			e.printStackTrace();
		}
	}

	private JButton btnNext;
	private JButton btnPrev;
	private JButton btnCrop;
	private JSlider sliderZoom;
	private ImagePanel panel;
	private JFrame frame;
}
package photocropper;

import java.awt.Color;
import java.awt.Graphics;
import java.awt.Graphics2D;
import java.awt.geom.AffineTransform;
import java.awt.image.BufferedImage;
import java.io.File;
import java.io.IOException;

import javax.imageio.ImageIO;
import javax.swing.JPanel;

/***
 * This component displays the image.
 * It also has functionality to crop the image.
 *
 * @author andrew
 *
 */
public class ImagePanel extends JPanel {

	private double zoom;
	private double scale;

	/**
	 *
	 */
	private static final long serialVersionUID = -2179167993341600319L;

	private BufferedImage displayImage;
	private CropBox cropBox;
	private String dir;

	public ImagePanel() {
		cropBox = new CropBox(0, 0, 0, 0);
		zoom = 1.0;
		scale = 1.0;
		dir = "";
	}

	/***
	 * Change the image that is displayed in the panel
	 * @param image
	 */
	public void changeImage(BufferedImage image) {
		displayImage = image;
	}

	/***
	 * Set the first coordinate of the crop box.
	 * This is the top corner of the crop box
	 * @param x
	 * @param y
	 */
	public void setFirstCoord(int x, int y) {
		cropBox.x = x;
		cropBox.y = y;
		this.repaint();
	}

	/***
	 * Set the second coordinate of the crop box.
	 * This is the bottom corner of the crop box.
	 * @param x
	 * @param y
	 */
	public void setSecondCoord(int x, int y) {
		cropBox.width = x - cropBox.x;
		cropBox.height = y - cropBox.y;
		this.repaint();
	}

	/***
	 * Set the size of the crop box
	 * @param width
	 * @param height
	 */
	public void setCropBoxSize(int width, int height) {
		cropBox.width = width;
		cropBox.height = height;
		this.repaint();
	}

	/***
	 * Set the zoom. This allows zooming in and out of the display image
	 * @param zoom
	 */
	public void setZoom(double zoom) {
		this.zoom = zoom;
		this.scale = 1 / zoom;
		this.repaint();
	}

	/***
	 * Draw the component.
	 * Draw the image then superimpose the cropbox on top of it.
	 */
	@Override
	public void paintComponent(Graphics graphics) {
		Graphics2D g = (Graphics2D) graphics;

		if(displayImage != null) {
			AffineTransform at = new AffineTransform();
			at.setToScale(zoom, zoom);
			g.drawImage(displayImage, at, this);
		}
		else {
			g.drawString("Image Not Available", (int)(getWidth()/2.5), getHeight()/2);
		}

		if(cropBox != null) {
			Color oldColor = g.getColor();
			g.setColor(cropBox.color);
			g.drawRect(cropBox.x, cropBox.y, cropBox.width, cropBox.height);

			g.setColor(oldColor);
		}
	}

	/***
	 * Crop the image selection and save to file
	 * @throws Exception
	 */
	public void crop() throws Exception {
		try{
			if(displayImage == null) {
				System.err.println("ERROR: No image to crop");
				return;
			}

			File outFile = new File(dir +   File.separator + System.currentTimeMillis() + ".png");

			//get the crop box coords with respect to the zoom property
			int x = (int)(cropBox.x * scale);
			int y = (int)(cropBox.y * scale);
			int width = (int)(cropBox.width *scale);
			int height = (int)(cropBox.height * scale);

			//reset for bad input
			if(x < 0) x = 0;
			if(y < 0) y = 0;
			if(width < 0) width = 0;
			if(height < 0) height = 0;

			//correct the width if it is out of bounds
			if((x + width) > displayImage.getWidth()) {
				width = displayImage.getWidth() - x;
			}

			//correct the height if it is out of bounds
			if((y + height) > displayImage.getHeight()) {
				height = displayImage.getHeight() - y;
			}

			//throw exception if selection is not in the image at all
			if(x > displayImage.getWidth()) {
				throw new Exception("Image selection is out of bounds");
			}
			if(y > displayImage.getHeight()) {
				throw new Exception("Image selection is out of bounds");
			}

			//crop the sub image to save
			BufferedImage img = displayImage.getSubimage(x, y,
					width, height);

			//check for the destination directory, create it if it doesn't exist
			File outputDir = new File(dir);
			if(!outputDir.isDirectory()) {
				System.out.println("Output directory does not exist, creating: "
						+ outputDir.getAbsolutePath());
				outputDir.mkdir();
			}

			ImageIO.write(img, "png", outFile);
		}
		catch (IOException e) {
			System.err.println("Could not save to file. Check directory permissions");
		}
	}

	/***
	 * Set the save directory
	 * @param dir
	 */
	public void setOutputDirectory(String dir) {
		this.dir = dir;
	}

	/***
	 * CropBox contains the properties of the cropping box
	 * @author andrew
	 */
	private class CropBox {
		private int x, y, width, height;
		private Color color;

		public CropBox(int x, int y, int width, int height) {
			this.x = x;
			this.y = y;
			this.width = width;
			this.height = height;
			this.color = Color.RED;
		}
	}
}
package photocropper;

import java.awt.event.MouseEvent;
import java.awt.event.MouseListener;
import java.awt.event.MouseMotionListener;

/***
 * This listens to mouse events and sets the coordinates
 * of the bounding box of the crop.
 *
 * @author andrew
 */
public class CropMouseListener implements MouseListener, MouseMotionListener {
	private ImagePanel panel;

	public CropMouseListener(ImagePanel panel) {
		this.panel = panel;
	}

	@Override
	public void mouseReleased(MouseEvent e) {
		if(panel != null) {
			panel.setSecondCoord(e.getX(), e.getY());
		}
	}

	/***
	 * If right click, zero out any existing box
	 */
	@Override
	public void mousePressed(MouseEvent e) {
		if(panel != null) {
			panel.setCropBoxSize(0, 0);

			if(e.getButton() == MouseEvent.BUTTON3) {
				panel.setFirstCoord(0, 0);
				panel.setSecondCoord(e.getX(), e.getY());
				return;
			}

			panel.setFirstCoord(e.getX(), e.getY());
		}
	}

	@Override
	public void mouseDragged(MouseEvent e) {
		//TODO - this only works for positive width and height
		//rework this so that it accommodates for both
		//negative width and height
		panel.setSecondCoord(e.getX(), e.getY());
	}

	@Override
	public void mouseExited(MouseEvent e) {
		//Not interested in this event
	}

	@Override
	public void mouseEntered(MouseEvent e) {
		//Not interested in this event
	}

	@Override
	public void mouseClicked(MouseEvent e) {
		//Not interested in this event
	}

	@Override
	public void mouseMoved(MouseEvent e) {
		//Not interested in this event
	}
}
package photocropper;

import java.awt.image.BufferedImage;
import java.io.File;
import java.io.IOException;
import java.util.ArrayList;

import javax.imageio.ImageIO;

/***
 * Some utilities used in the photo cropper
 * @author andrew
 *
 */
public class Utils {

	/***
	 * Load an image from file
	 * @param directory the directory path to the image
	 * @param filename the filename of the image
	 * @return the image in memory
	 * @throws IOException Thrown if cannot open the image
	 */
	public static BufferedImage loadImage(String directory, String filename)
			throws IOException {
		BufferedImage image = null;
		String dir = "";

		if(!directory.endsWith("/")) {
			dir = directory + "/";
		}
		else {
			dir = directory;
		}

		File file = new File(dir + filename);
		try{
			image = ImageIO.read(file);
		}
		catch(IOException e) {
			System.err.println("cannot open file " + file.getAbsolutePath() + e.getLocalizedMessage());
			throw e;
		}
		return image;
	}

	/***
	 * Get the names of all the files in a directory
	 * @param dirName The path of the directory
	 * @return a list of the files in a directory
	 */
	public static String[] getFiles(String dirName) {
		File dir = new File(dirName);

		if(dir.isDirectory()) {
			String[] files = dir.list();

			return files;
		}
		return null;
	}

	/***
	 * Helper method to convert an array to an arraylist
	 * @param array The array to convert
	 * @return returns the contents of the array in an arraylist format
	 */
	public static ArrayList toArrayList(String[] array) {
		ArrayList list = new ArrayList<>();

		for(String item: array) {
			list.add(item);
		}
		return list;
	}

	/***
	 * Get the file extension from a filename.
	 * This works by getting the last occurrence of the dot
	 * and extracting the characters after it.
	 * If test.txt is passed in, the string txt is returned.
	 * @param file The name of the file
	 * @return the file extension
	 */
	public static String getExtension(String file) {
		String extension = null;

		if(file == null) {
			return null;
		}

		int indexOfDot = file.lastIndexOf(".");

		if(indexOfDot != -1) {
			extension = file.substring(indexOfDot + 1);
		}

		return extension;
	}

	/***
	 * Loop through a file list and remove any non-images.
	 * @param fileList
	 */
	public static void filterNonImages(ArrayList fileList) {
		ArrayList fileToBeRemoved = new ArrayList<>();

		//store list of which files need to be filtered out
		for(String file: fileList) {
			if(!isImage(file)) {
				fileToBeRemoved.add(file);
			}
		}

		//filter out files from the original list
		for(String file: fileToBeRemoved) {
			fileList.remove(file);
		}
	}

	/***
	 * Check if the file is an image.
	 * This is done based on the file extension
	 * @param filename
	 * @return
	 */
	public static boolean isImage(String filename) {
		String[] imageExtensions = {"png", "jpg"};

		String extension = getExtension(filename);

		if(extension == null) {
			return false;
		}

		for(String ext: imageExtensions) {
			if(ext.equals(extension.toLowerCase())) {
				return true;
			}
		}

		return false;
	}
}


sudo apt-get install software-properties-common python-software-properties
sudo add-apt-repository ppa:djart/mindlna
sudo apt-get update
sudo apt-get install minidlna
sudo vim /etc/minidlna.conf
media_dir=A,/home/myuser/Music
media_dir=P,/home/myuser/Pictures
media_dir=V,/home/myuser/Videos
db_dir=/home/myuser/Cache
log_dir=/home/myuser/Log
friendly_name=myServerName
sudo service minidlna restart
minidlnad -R
CREATE USER 'remoteuser'@'%' IDENTIFIED BY 'remoteuser';
GRANT ALL ON mydatabase.* TO 'remoteuser'@'%';
SET PASSWORD FOR 'remoteuser'@'%'=password('remotepassword');
#include#include MODULE_LICENSE("Dual BSD/GPL"); static int hello_init(void) { printk(KERN_ALERT "Hello, world\n"); return 0; } static void hello_exit(void) { printk(KERN_ALERT "Goodbye, cruel world\n"); } module_init(hello_init); module_exit(hello_exit);
ifneq ($(KERNELRELEASE),)
        obj-m := hello.o

else
        KERNELDIR ?= /lib/modules/$(shell uname -r)/build
        PWD := $(shell pwd)

default:
        $(MAKE) -C $(KERNELDIR) M=$(PWD) modules
endif
make
sudo insmod hello.koView the messages by entering the dmesg command.
dmesg
sudo rmmod hello
sudo apt-get install mpc mpd
mpc add http://stream.hoerradar.de:80/deltaradio-alternative128Play the station using the following command.
mpc playUse the following command to stop the player.
mpc stopOnce the station is added, you will only need to use mpc play or mpc stop to control the player.
sudo vim /etc/network/interfaces
auto lo

iface lo inet loopback
iface eth0 inet dhcp

allow-hotplug wlan0
auto wlan0

iface wlan0 inet dhcp
        wpa-ssid "your_network"
        wpa-psk "network_password"
Restart networking to pick up the changes
sudo /etc/init.d/networking restart
