The purpose of this code is to read in the title and body of the text getting shared. Then it takes a screenshot of the current screen in the game, saves it to a file, and then, depending on the platform, the screenshot is sent to the native Android or iOS share libraries with the title and body of the text that will be shared. This will present a native pop-up on the device showing what applications are available to share the media.
This code is adapted from this github project: https://github.com/ChrisMaire/unity-native-sharing
Start with an empty project and an empty scene
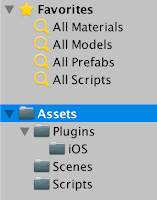
The following directory structure should be created. A Scripts directory for the Share script was created for organizational purposes but this step is not necessary.
It is very important to create the Plugins/iOS directories exactly as shown below.
Create the code to Share content
A
Create a class called Share.cs under Scripts with the following contents.
using System.Collections;
using System.Collections.Generic;
using System.IO;
using System.Runtime.InteropServices;
using UnityEngine;

public class Share : MonoBehaviour {
 public string title;
 public string bodyText;

 public void SaveAndShareImage() {
  string destination = Path.Combine(Application.persistentDataPath, "test.png");
  SaveImage (destination);
  ShareImage (destination, title,
   bodyText);
 }

 void ShareImage(string imageLocation, string titleText, string bodyText) {
  #if UNITY_IOS
  CallSocialShareAdvanced(bodyText, titleText, "", imageLocation);
  #endif

  #if UNITY_ANDROID
  AndroidJavaClass intentClass = new AndroidJavaClass("android.content.Intent");
  AndroidJavaObject intentObject = new AndroidJavaObject("android.content.Intent");
  intentObject.Call("setAction", intentClass.GetStatic("ACTION_SEND"));
  AndroidJavaClass uriClass = new AndroidJavaClass("android.net.Uri");
  AndroidJavaObject uriObject = uriClass.CallStatic("parse","file://" + imageLocation);
  intentObject.Call("putExtra", intentClass.GetStatic("EXTRA_STREAM"), uriObject);
  intentObject.Call("putExtra", intentClass.GetStatic("EXTRA_TEXT"), bodyText);
  intentObject.Call("putExtra", intentClass.GetStatic("EXTRA_SUBJECT"), titleText);
  intentObject.Call("setType", "image/jpeg");
  AndroidJavaClass unity = new AndroidJavaClass("com.unity3d.player.UnityPlayer");
  AndroidJavaObject currentActivity = unity.GetStatic("currentActivity");

  currentActivity.Call("startActivity", intentObject);
  #endif
 }

 void SaveImage(string destination) {
  Texture2D screenTexture = new Texture2D(Screen.width, Screen.height, TextureFormat.RGB24, true);
  screenTexture.ReadPixels(new Rect(0, 0, Screen.width, Screen.height),0,0);
  screenTexture.Apply();
  byte[] dataToSave = screenTexture.EncodeToPNG();
  File.WriteAllBytes(destination, dataToSave);
 }

 #if UNITY_IOS
 public struct ConfigStruct
 {
  public string title;
  public string message;
 }

 [DllImport ("__Internal")] private static extern void showAlertMessage(ref ConfigStruct conf);

 public struct SocialSharingStruct
 {
  public string text;
  public string url;
  public string image;
  public string subject;
 }

 [DllImport ("__Internal")] private static extern void showSocialSharing(ref SocialSharingStruct conf);

 public static void CallSocialShare(string title, string message)
 {
  ConfigStruct conf = new ConfigStruct();
  conf.title  = title;
  conf.message = message;
  showAlertMessage(ref conf);
 }


 public static void CallSocialShareAdvanced(string defaultTxt, string subject, string url, string img)
 {
  SocialSharingStruct conf = new SocialSharingStruct();
  conf.text = defaultTxt;
  conf.url = url;
  conf.image = img;
  conf.subject = subject;

  showSocialSharing(ref conf);
 }
 #endif
}
Create an iOS plugin
At this stage, there is enough code to get Android sharing working. Unity requires a native iOS plugin to do native sharing. An iOS plugin with two more files need to be created. The files that need to be created are:
Plugins/iOS/iOSNativeShare.h
Plugins/iOS/iOSNativeShare.m
Then make sure that these files have the following Objective C code. The following code was taken from https://github.com/ChrisMaire/unity-native-sharing
Plugins/iOS/iOSNativeShare.h
#import "UnityAppController.h"

@interface iOSNativeShare : UIViewController
{
    UINavigationController *navController;
}


struct ConfigStruct {
    char* title;
    char* message;
};

struct SocialSharingStruct {
    char* text;
    char* url;
    char* image;
    char* subject;
};


#ifdef __cplusplus
extern "C" {
#endif

    void showAlertMessage(struct ConfigStruct *confStruct);
    void showSocialSharing(struct SocialSharingStruct *confStruct);

#ifdef __cplusplus
}
#endif


@end
Next, add the following code to
Plugins/iOS/iOSNativeShare.m
#import "iOSNativeShare.h"

@implementation iOSNativeShare{
}

#ifdef UNITY_4_0 || UNITY_5_0

#import "iPhone_View.h"

#else

extern UIViewController* UnityGetGLViewController();

#endif

+(id) withTitle:(char*)title withMessage:(char*)message{

 return [[iOSNativeShare alloc] initWithTitle:title withMessage:message];
}

-(id) initWithTitle:(char*)title withMessage:(char*)message{

 self = [super init];

 if( !self ) return self;

 ShowAlertMessage([[NSString alloc] initWithUTF8String:title], [[NSString alloc] initWithUTF8String:message]);

 return self;

}

void ShowAlertMessage (NSString *title, NSString *message){

 UIAlertView *alert = [[UIAlertView alloc] initWithTitle:title

                       message:message

                       delegate:nil

                       cancelButtonTitle:@"OK"

                       otherButtonTitles: nil];

 [alert show];

}

+(id) withText:(char*)text withURL:(char*)url withImage:(char*)image withSubject:(char*)subject{

 return [[iOSNativeShare alloc] initWithText:text withURL:url withImage:image withSubject:subject];
}

-(id) initWithText:(char*)text withURL:(char*)url withImage:(char*)image withSubject:(char*)subject{

 self = [super init];

 if( !self ) return self;


    NSString *mText = text ? [[NSString alloc] initWithUTF8String:text] : nil;

    NSString *mUrl = url ? [[NSString alloc] initWithUTF8String:url] : nil;

    NSString *mImage = image ? [[NSString alloc] initWithUTF8String:image] : nil;

    NSString *mSubject = subject ? [[NSString alloc] initWithUTF8String:subject] : nil;


 NSMutableArray *items = [NSMutableArray new];

 if(mText != NULL && mText.length > 0){

  [items addObject:mText];

 }

 if(mUrl != NULL && mUrl.length > 0){

  NSURL *formattedURL = [NSURL URLWithString:mUrl];

  [items addObject:formattedURL];

 }
 if(mImage != NULL && mImage.length > 0){

  if([mImage hasPrefix:@"http"])
  {
   NSURL *urlImage = [NSURL URLWithString:mImage];

            NSError *error = nil;
            NSData *dataImage = [NSData dataWithContentsOfURL:urlImage options:0 error:&error];

            if (!error) {
                UIImage *imageFromUrl = [UIImage imageWithData:dataImage];
                [items addObject:imageFromUrl];
            } else {
                ShowAlertMessage(@"Error", @"Cannot load image");
            }
        }
        else if ( [self isStringValideBase64:mImage]){
            NSData* imageBase64Data = [[NSData alloc]initWithBase64Encoding:mImage];
            UIImage* image = [UIImage imageWithData:imageBase64Data];
            if (image!= nil){
                [items addObject:image];
            }
            else{
                ShowAlertMessage(@"Error", @"Cannot load image");
            }
        }
        else{
   NSFileManager *fileMgr = [NSFileManager defaultManager];
   if([fileMgr fileExistsAtPath:mImage]){

    NSData *dataImage = [NSData dataWithContentsOfFile:mImage];

    UIImage *imageFromUrl = [UIImage imageWithData:dataImage];

    [items addObject:imageFromUrl];
   }else{
    ShowAlertMessage(@"Error", @"Cannot find image");
   }
  }
 }

 UIActivityViewController *activity = [[UIActivityViewController alloc] initWithActivityItems:items applicationActivities:Nil];

    if(mSubject != NULL) {
        [activity setValue:mSubject forKey:@"subject"];
    } else {
        [activity setValue:@"" forKey:@"subject"];
    }

 UIViewController *rootViewController = UnityGetGLViewController();
    //if iPhone
    if (UI_USER_INTERFACE_IDIOM() == UIUserInterfaceIdiomPhone) {
          [rootViewController presentViewController:activity animated:YES completion:Nil];
    }
    //if iPad
    else {
        // Change Rect to position Popover
        UIPopoverController *popup = [[UIPopoverController alloc] initWithContentViewController:activity];
        [popup presentPopoverFromRect:CGRectMake(rootViewController.view.frame.size.width/2, rootViewController.view.frame.size.height/4, 0, 0)inView:rootViewController.view permittedArrowDirections:UIPopoverArrowDirectionAny animated:YES];
    }
    return self;
}

-(BOOL) isStringValideBase64:(NSString*)string{

    NSString *regExPattern = @"^(?:[A-Za-z0-9+/]{4})*(?:[A-Za-z0-9+/]{2}==|[A-Za-z0-9+/]{3}=)?$";

    NSRegularExpression *regEx = [[NSRegularExpression alloc] initWithPattern:regExPattern options:NSRegularExpressionCaseInsensitive error:nil];
    NSUInteger regExMatches = [regEx numberOfMatchesInString:string options:0 range:NSMakeRange(0, [string length])];
    return regExMatches != 0;
}

# pragma mark - C API
iOSNativeShare* instance;

void showAlertMessage(struct ConfigStruct *confStruct) {
 instance = [iOSNativeShare withTitle:confStruct->title withMessage:confStruct->message];
}

void showSocialSharing(struct SocialSharingStruct *confStruct) {
 instance = [iOSNativeShare withText:confStruct->text withURL:confStruct->url withImage:confStruct->image withSubject:confStruct->subject];
}

@end
Hook up the code to a button press
Now, to hook up this code to your application, you can trigger it from a button press.
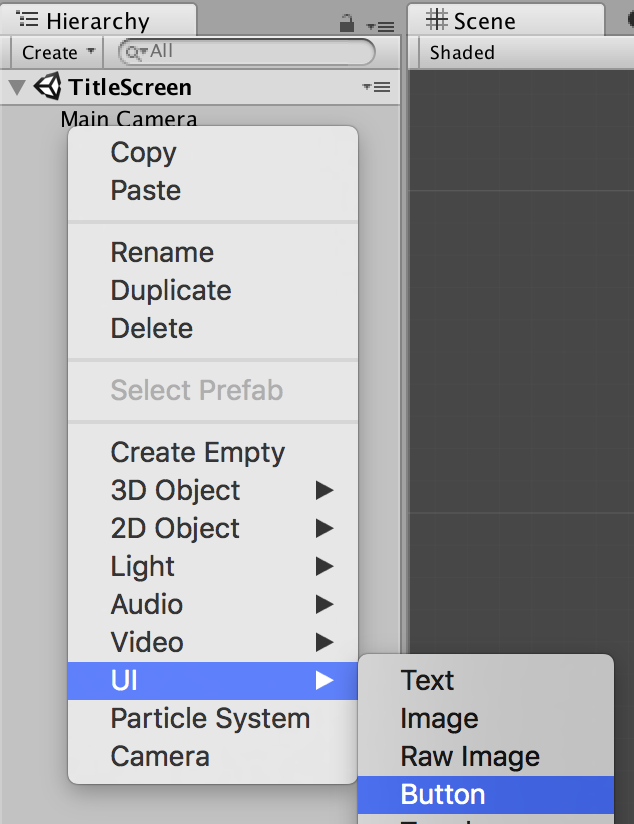
Right click on the Hierarchy, select UI -> Button
That will create a Canvas and a Button in the Hierarchy, and some embedded text in the button. What we are interested in here is adding the Share script to the button.
Select the button in the hierarchy and in the inspector, click "Add Component" and type Share and click on the script.
Now there are two text fields, one for the title of the share content and one for the share body text.
Type whatever you want to be in the body and in the title of the shared content in here.
Now click on "On Click ()" "+" button on the Button component in the inspector.
Click on the "None (Ob"... text field and select Button. Then in the dropdown with "No Function", select Share -> SendAndShareImage()
This makes the Share code to get triggered when the button is clicked.
Next deploy the game to an iOS or Android device, and you will be able to share an image with a title and text