I recently scanned in an old box of photos for my family. The scanned image had a few photos surrounded by a lot of whitespace.
I didn't want to have to open each photo manually, crop it, choose a file name, repeat. I wanted to have some of this process automated.
I wrote this simple program to make this process easier.
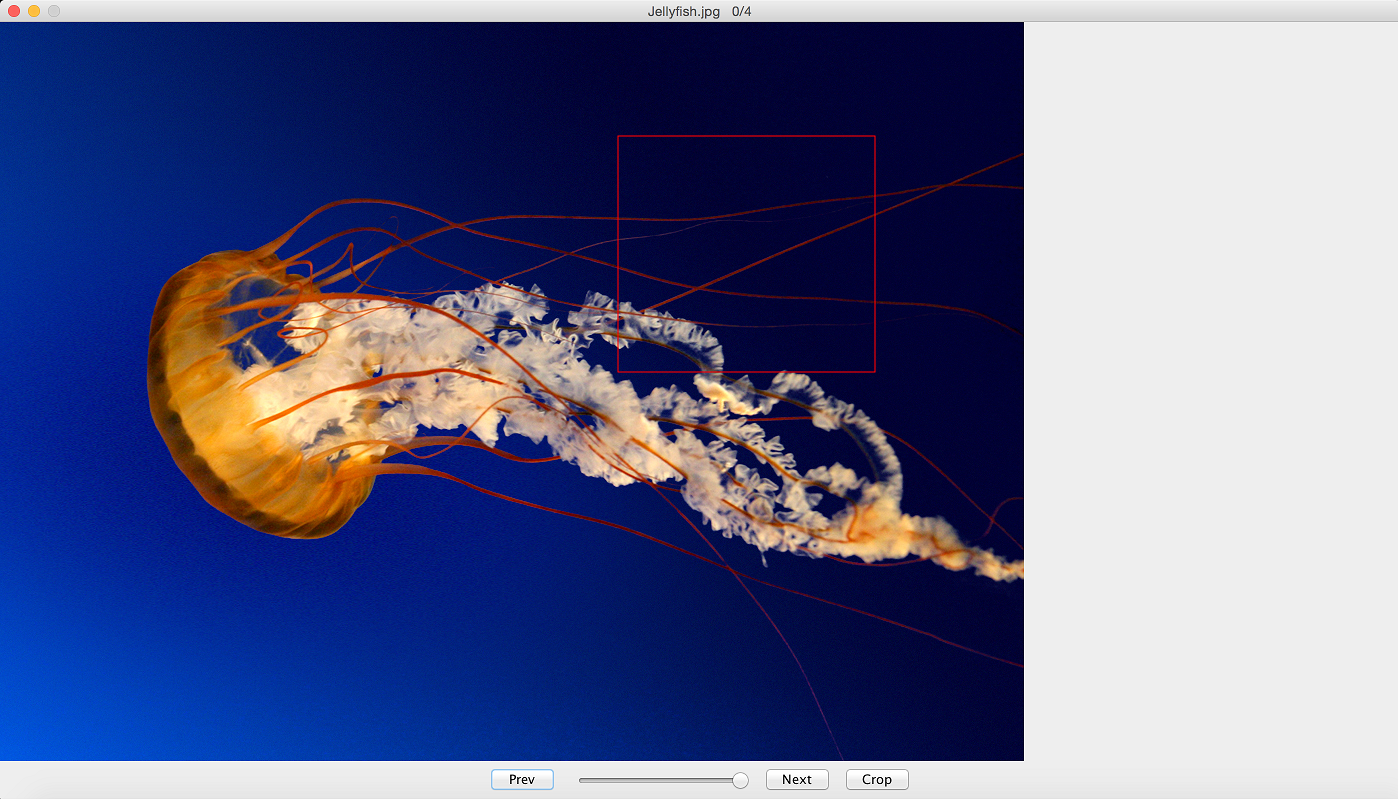
First you choose a directory to work from.
Once this is done, the first image from the directory is loaded.
You can then click and drag a box around an image the image you want to crop.
Once you are happy with the image selection, click the Crop button. This will save the selection to a file.
The file name is the time since epoch in milliseconds.
The file format is png.
The files are saved in a "cropped" directory. This is in the same directory as the original images.
You can then repeat this multiple times per image.
Once you want to work on the next image, you can click the next button for the next image or the prev button for the previous image.
There is a slider allows that allows to zoom in and zoom out of the image.
package photocropper;

import java.awt.BorderLayout;
import java.awt.Dimension;
import java.awt.event.ActionEvent;
import java.awt.image.BufferedImage;
import java.io.File;
import java.io.IOException;
import java.util.ArrayList;

import javax.swing.JButton;
import javax.swing.JFileChooser;
import javax.swing.JFrame;
import javax.swing.JOptionPane;
import javax.swing.JPanel;
import javax.swing.JSlider;
import javax.swing.event.ChangeEvent;

/***
 * This is the main class of the application. It constructs the UI and
 * registers event listeners,
 * @author andrew
 *
 */
public class PhotoCropper {

	private ArrayList photos;
	private int currentImageIndex = -1;
	private String directory;

	public PhotoCropper() throws Exception {
		frame = new JFrame();
		panel = new ImagePanel();

		while((directory = getPhotoDirectory()) == null) {
			System.err.println("This application needs to have a photo directory. Exiting...");
			System.exit(1);
		}

		String[] files = Utils.getFiles(directory);

		ArrayList fileList = Utils.toArrayList(files);
		Utils.filterNonImages(fileList);
		photos = fileList;

		panel.setOutputDirectory(directory + File.separator + "cropped");

		CropMouseListener cropListener = new CropMouseListener(panel);
		panel.addMouseListener(cropListener);
		panel.addMouseMotionListener(cropListener);

		if(photos.size() > 0) {
			BufferedImage img = Utils.loadImage(directory, photos.get(0));
			frame.setTitle(photos.get(0)+ "\t" + 0 + "/" + photos.size());
			currentImageIndex = 0;
			panel.changeImage(img);
		}

		JPanel controlPanel = new JPanel();

		btnNext = new JButton("Next");
		btnPrev = new JButton("Prev");
		btnCrop = new JButton("Crop");

		sliderZoom = new JSlider(1, 100);
		sliderZoom.setValue(100);
		setUpListeners();
		controlPanel.add(btnPrev);
		controlPanel.add(sliderZoom);
		controlPanel.add(btnNext);
		controlPanel.add(btnCrop);

		//set resizeable to false so the resize will not interfere
		//when interacting with images close to the border
		frame.setResizable(false);

		frame.add(controlPanel, BorderLayout.SOUTH);

		frame.add(panel, BorderLayout.CENTER);

		frame.setSize(new Dimension(1400,800));
		frame.setDefaultCloseOperation(JFrame.EXIT_ON_CLOSE);
		frame.setVisible(true);
	}

	/***
	 *
	 * @return
	 */
	public String getPhotoDirectory() {
		JFileChooser fileChooser = new JFileChooser();
		String dir = null;
		fileChooser.setDialogTitle("Select Photo Directory");

		fileChooser.setFileSelectionMode(JFileChooser.DIRECTORIES_ONLY);

		int returnVal = fileChooser.showOpenDialog(frame);
		if (returnVal == JFileChooser.APPROVE_OPTION) {
			dir = fileChooser.getSelectedFile().getAbsolutePath();
		}

		return dir;
	}

	public void setUpListeners() {
		btnNext.addActionListener((ActionEvent evt) -> {
			if((currentImageIndex + 1) >= photos.size()) {
				currentImageIndex = 0;
			}
			else {
				currentImageIndex++;
			}

			try {
				BufferedImage prevImage = Utils.loadImage(directory, photos.get(currentImageIndex));
				frame.setTitle(photos.get(currentImageIndex) + "\t" + currentImageIndex + "/" + photos.size());
				panel.changeImage(prevImage);
				frame.repaint();
			}
			catch(IOException e) {
				System.err.println("ERROR: could not load " + photos.get(currentImageIndex));
				e.printStackTrace();
			}
		});

		btnPrev.addActionListener((ActionEvent evt) -> {
			if((currentImageIndex - 1) < 0) {
				currentImageIndex = photos.size() -1;
			}
			else {
				currentImageIndex--;
			}

			try {
				BufferedImage prevImage = Utils.loadImage(directory, photos.get(currentImageIndex));
				frame.setTitle(photos.get(currentImageIndex) + "\t" + currentImageIndex + "/" + photos.size());
				panel.changeImage(prevImage);
				frame.repaint();
			}
			catch(IOException e) {
				System.err.println("ERROR: could not load " + photos.get(currentImageIndex));
				e.printStackTrace();
			}
		});

		btnCrop.addActionListener((ActionEvent evt) -> {
			try{
				panel.crop();
			}
			catch(Exception e) {
				JOptionPane.showMessageDialog(frame,
					    "Could not crop image. Bad image selection",
					    "Crop Error",
					    JOptionPane.ERROR_MESSAGE);
			}
		});

		sliderZoom.addChangeListener((ChangeEvent e) -> {
			double value = sliderZoom.getValue();
			double zoom = value / 100.0;
			panel.setZoom(zoom);
		});
	}

	public static void main(String[] args) {
		try {
			new PhotoCropper();
		}
		catch(Exception e) {
			e.printStackTrace();
		}
	}

	private JButton btnNext;
	private JButton btnPrev;
	private JButton btnCrop;
	private JSlider sliderZoom;
	private ImagePanel panel;
	private JFrame frame;
}
package photocropper;

import java.awt.Color;
import java.awt.Graphics;
import java.awt.Graphics2D;
import java.awt.geom.AffineTransform;
import java.awt.image.BufferedImage;
import java.io.File;
import java.io.IOException;

import javax.imageio.ImageIO;
import javax.swing.JPanel;

/***
 * This component displays the image.
 * It also has functionality to crop the image.
 *
 * @author andrew
 *
 */
public class ImagePanel extends JPanel {

	private double zoom;
	private double scale;

	/**
	 *
	 */
	private static final long serialVersionUID = -2179167993341600319L;

	private BufferedImage displayImage;
	private CropBox cropBox;
	private String dir;

	public ImagePanel() {
		cropBox = new CropBox(0, 0, 0, 0);
		zoom = 1.0;
		scale = 1.0;
		dir = "";
	}

	/***
	 * Change the image that is displayed in the panel
	 * @param image
	 */
	public void changeImage(BufferedImage image) {
		displayImage = image;
	}

	/***
	 * Set the first coordinate of the crop box.
	 * This is the top corner of the crop box
	 * @param x
	 * @param y
	 */
	public void setFirstCoord(int x, int y) {
		cropBox.x = x;
		cropBox.y = y;
		this.repaint();
	}

	/***
	 * Set the second coordinate of the crop box.
	 * This is the bottom corner of the crop box.
	 * @param x
	 * @param y
	 */
	public void setSecondCoord(int x, int y) {
		cropBox.width = x - cropBox.x;
		cropBox.height = y - cropBox.y;
		this.repaint();
	}

	/***
	 * Set the size of the crop box
	 * @param width
	 * @param height
	 */
	public void setCropBoxSize(int width, int height) {
		cropBox.width = width;
		cropBox.height = height;
		this.repaint();
	}

	/***
	 * Set the zoom. This allows zooming in and out of the display image
	 * @param zoom
	 */
	public void setZoom(double zoom) {
		this.zoom = zoom;
		this.scale = 1 / zoom;
		this.repaint();
	}

	/***
	 * Draw the component.
	 * Draw the image then superimpose the cropbox on top of it.
	 */
	@Override
	public void paintComponent(Graphics graphics) {
		Graphics2D g = (Graphics2D) graphics;

		if(displayImage != null) {
			AffineTransform at = new AffineTransform();
			at.setToScale(zoom, zoom);
			g.drawImage(displayImage, at, this);
		}
		else {
			g.drawString("Image Not Available", (int)(getWidth()/2.5), getHeight()/2);
		}

		if(cropBox != null) {
			Color oldColor = g.getColor();
			g.setColor(cropBox.color);
			g.drawRect(cropBox.x, cropBox.y, cropBox.width, cropBox.height);

			g.setColor(oldColor);
		}
	}

	/***
	 * Crop the image selection and save to file
	 * @throws Exception
	 */
	public void crop() throws Exception {
		try{
			if(displayImage == null) {
				System.err.println("ERROR: No image to crop");
				return;
			}

			File outFile = new File(dir +   File.separator + System.currentTimeMillis() + ".png");

			//get the crop box coords with respect to the zoom property
			int x = (int)(cropBox.x * scale);
			int y = (int)(cropBox.y * scale);
			int width = (int)(cropBox.width *scale);
			int height = (int)(cropBox.height * scale);

			//reset for bad input
			if(x < 0) x = 0;
			if(y < 0) y = 0;
			if(width < 0) width = 0;
			if(height < 0) height = 0;

			//correct the width if it is out of bounds
			if((x + width) > displayImage.getWidth()) {
				width = displayImage.getWidth() - x;
			}

			//correct the height if it is out of bounds
			if((y + height) > displayImage.getHeight()) {
				height = displayImage.getHeight() - y;
			}

			//throw exception if selection is not in the image at all
			if(x > displayImage.getWidth()) {
				throw new Exception("Image selection is out of bounds");
			}
			if(y > displayImage.getHeight()) {
				throw new Exception("Image selection is out of bounds");
			}

			//crop the sub image to save
			BufferedImage img = displayImage.getSubimage(x, y,
					width, height);

			//check for the destination directory, create it if it doesn't exist
			File outputDir = new File(dir);
			if(!outputDir.isDirectory()) {
				System.out.println("Output directory does not exist, creating: "
						+ outputDir.getAbsolutePath());
				outputDir.mkdir();
			}

			ImageIO.write(img, "png", outFile);
		}
		catch (IOException e) {
			System.err.println("Could not save to file. Check directory permissions");
		}
	}

	/***
	 * Set the save directory
	 * @param dir
	 */
	public void setOutputDirectory(String dir) {
		this.dir = dir;
	}

	/***
	 * CropBox contains the properties of the cropping box
	 * @author andrew
	 */
	private class CropBox {
		private int x, y, width, height;
		private Color color;

		public CropBox(int x, int y, int width, int height) {
			this.x = x;
			this.y = y;
			this.width = width;
			this.height = height;
			this.color = Color.RED;
		}
	}
}
package photocropper;

import java.awt.event.MouseEvent;
import java.awt.event.MouseListener;
import java.awt.event.MouseMotionListener;

/***
 * This listens to mouse events and sets the coordinates
 * of the bounding box of the crop.
 *
 * @author andrew
 */
public class CropMouseListener implements MouseListener, MouseMotionListener {
	private ImagePanel panel;

	public CropMouseListener(ImagePanel panel) {
		this.panel = panel;
	}

	@Override
	public void mouseReleased(MouseEvent e) {
		if(panel != null) {
			panel.setSecondCoord(e.getX(), e.getY());
		}
	}

	/***
	 * If right click, zero out any existing box
	 */
	@Override
	public void mousePressed(MouseEvent e) {
		if(panel != null) {
			panel.setCropBoxSize(0, 0);

			if(e.getButton() == MouseEvent.BUTTON3) {
				panel.setFirstCoord(0, 0);
				panel.setSecondCoord(e.getX(), e.getY());
				return;
			}

			panel.setFirstCoord(e.getX(), e.getY());
		}
	}

	@Override
	public void mouseDragged(MouseEvent e) {
		//TODO - this only works for positive width and height
		//rework this so that it accommodates for both
		//negative width and height
		panel.setSecondCoord(e.getX(), e.getY());
	}

	@Override
	public void mouseExited(MouseEvent e) {
		//Not interested in this event
	}

	@Override
	public void mouseEntered(MouseEvent e) {
		//Not interested in this event
	}

	@Override
	public void mouseClicked(MouseEvent e) {
		//Not interested in this event
	}

	@Override
	public void mouseMoved(MouseEvent e) {
		//Not interested in this event
	}
}
package photocropper;

import java.awt.image.BufferedImage;
import java.io.File;
import java.io.IOException;
import java.util.ArrayList;

import javax.imageio.ImageIO;

/***
 * Some utilities used in the photo cropper
 * @author andrew
 *
 */
public class Utils {

	/***
	 * Load an image from file
	 * @param directory the directory path to the image
	 * @param filename the filename of the image
	 * @return the image in memory
	 * @throws IOException Thrown if cannot open the image
	 */
	public static BufferedImage loadImage(String directory, String filename)
			throws IOException {
		BufferedImage image = null;
		String dir = "";

		if(!directory.endsWith("/")) {
			dir = directory + "/";
		}
		else {
			dir = directory;
		}

		File file = new File(dir + filename);
		try{
			image = ImageIO.read(file);
		}
		catch(IOException e) {
			System.err.println("cannot open file " + file.getAbsolutePath() + e.getLocalizedMessage());
			throw e;
		}
		return image;
	}

	/***
	 * Get the names of all the files in a directory
	 * @param dirName The path of the directory
	 * @return a list of the files in a directory
	 */
	public static String[] getFiles(String dirName) {
		File dir = new File(dirName);

		if(dir.isDirectory()) {
			String[] files = dir.list();

			return files;
		}
		return null;
	}

	/***
	 * Helper method to convert an array to an arraylist
	 * @param array The array to convert
	 * @return returns the contents of the array in an arraylist format
	 */
	public static ArrayList toArrayList(String[] array) {
		ArrayList list = new ArrayList<>();

		for(String item: array) {
			list.add(item);
		}
		return list;
	}

	/***
	 * Get the file extension from a filename.
	 * This works by getting the last occurrence of the dot
	 * and extracting the characters after it.
	 * If test.txt is passed in, the string txt is returned.
	 * @param file The name of the file
	 * @return the file extension
	 */
	public static String getExtension(String file) {
		String extension = null;

		if(file == null) {
			return null;
		}

		int indexOfDot = file.lastIndexOf(".");

		if(indexOfDot != -1) {
			extension = file.substring(indexOfDot + 1);
		}

		return extension;
	}

	/***
	 * Loop through a file list and remove any non-images.
	 * @param fileList
	 */
	public static void filterNonImages(ArrayList fileList) {
		ArrayList fileToBeRemoved = new ArrayList<>();

		//store list of which files need to be filtered out
		for(String file: fileList) {
			if(!isImage(file)) {
				fileToBeRemoved.add(file);
			}
		}

		//filter out files from the original list
		for(String file: fileToBeRemoved) {
			fileList.remove(file);
		}
	}

	/***
	 * Check if the file is an image.
	 * This is done based on the file extension
	 * @param filename
	 * @return
	 */
	public static boolean isImage(String filename) {
		String[] imageExtensions = {"png", "jpg"};

		String extension = getExtension(filename);

		if(extension == null) {
			return false;
		}

		for(String ext: imageExtensions) {
			if(ext.equals(extension.toLowerCase())) {
				return true;
			}
		}

		return false;
	}
}